Fed Up - Full Hard Drive Syndrome
Getting the "Start-up disk is full" warning? Here are some tips that can help you reclaim some drive space.Backup, Backup, Backup
Backup (as in save important stuff just-in-case) before you do anything that will significantly impact your computer's internal storage. If you have an external hard-drive with at least 2x the capacity of your internal drive, consider using Time Machine to create automatic backups of your data. Time Machine, built into your Mac, will automatically check your computer every hour for changes and back them up incrementally. This means it will only save changes, not re-copy all of you data over again. You can use an external drive physically attached to your machine (USB, Firewire, Thunderbolt) or storage on your network, often referred to as Network Attached Storage or NAS. One of the best and easiest solutions is to use an Apple Time Capsule. It is easy to configure and you can "set it and forget it." Anytime you are on the same network as your Time Capsule, Time Machine will back up your drive in the background. For more information you can read about it here.
 |
| Trash Full |
Alternatively, you can backup certain files manually to any storage device. But the important thing is DO IT! Got it done? It's OK, I can wait.
Empty the Trash
You may have heard of hoarding. Your computer is notorious for it. It loves to hang on to old junk. Teach it some new habits by learning a few of your own. Does your trash bin look like this? If you are unsure what is in it, double click to open it and see its contents. Junk, right? Click "Empty Trash." Now. Depending on how long it has been since you took out the trash, you can reclaim a Gigabyte or two or even more.
 |
| iPhoto Trash |
Actually, this is not the only trash can in your system. Did you know that all those pictures you "deleted" from iPhoto are probably still there? iPhoto has its own trash so you will need to review its contents and delete there too. Depending on the size of your photo library and what you have trashed over time, this could release a HUGE amount of disk space.
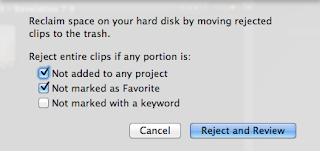
If you use iMovie to make those cute kitty-cat videos for posting on YouTube, the files can add up fast. Videos are the single most users of disk space in your computer. Consider purging them especially if you have them backed up elsewhere.
 |
| iMove Reclaim Space |
Downloads Folder
Another place to check for bloat is your Downloads Folder. This folder is the place were all the photos, videos, PDF's and apps you have collected from Safari or your preferred Web browser are kept. Clean it out. You'll feel much better.
Apple Mail, the Hungry Hippo
Apple Mail stores every attachment of every email you have ever retrieved using it. If you are a mailbox packrat, then Apple mail (or any desktop email client you use) could be holding several gigabytes of space that you can free up. The easiest and first thing you can do is to make sure that your deleted mail items are indeed, well, deleted. Go to Mail preferences, (keyboard shortcut command+, (⌘,) and select the Accounts Tab. Look at the Trash settings for each account you use. Also, check the Junk Mail settings while you are at it.
 |
| Apple Mail Settings |
Advanced (But not Difficult) Ways to Look for Old Files
Still need some space? Remember, you have backed up your stuff right? Right? OK, let's move on. Your Finder is a powerful tool. Did you know you can set up special searches that will be saved as "Smart Folders" that will always update? For example, suppose you want to see all PDF files on your Mac that have not been opened in the past year. Make a Smart Folder that always shows PDF's a year old or older. Here's how you do it:
- Use the search bar on Finder to start a search for files of Kind PDF.
- Click on the Plus icon for more filtering options such as "last opened date" or Name.
- When you have added all the desired filters, click Save and name the folder.
You will now have a "Smart Folder" that is always up to date. There you can review and purge files you no longer need.
There's an App for That
Also, there are several third party applications available on the Mac App Store as well as online that you can use to see what is taking up all the space on your Mac and clean it up. The Utilities category on the App Store is a good place to start. DaisyDisk is one of my favorites. It is easy to use and gives you a visual representation of what your disk storage space looks like. It is not free, but at $9.99 it is cheaper than a arterial McDonalds attack and you get it forever.
Bottom Line...
With good housekeeping and regular backups of your data, you can keep your hard disk humming along for years. Well, I gotta go... Time to empty the trash. "Coming, Honey!!"
Further Reading
Here are some articles you may find useful...
OS X Mountain Lion: Increase disk spaceOS X Mountain Lion: Create or modify a Smart Folder5 Simple Ways to Reclaim Disk Space
Comments